You are here: Rear Shocks > FLOAT > FLOAT CTD - Factory
FLOAT CTD - Factory
Installing Your Shock | General Maintenance | Before You Ride | Setting Air Pressure with Sag | Climb. Trail. Descend. | Adjusting Rebound | Stuck Down Shock | Air Sleeve Maintenance | Service Intervals | Important Safety Information

|
lengths & travels
|
5.5 x 1.0; 6.0 x 1.25; 6.5 x 1.5; 7.5 x 2.0; 7.875 x 2.0; 7.875 x 2.25; 8.5 x 2.5
|
|
model features, adjustments
|
|
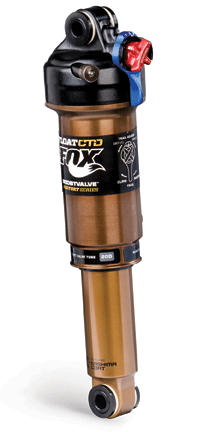
CTD BV with Trail Adjust: Kashima coated air sleeve and body, lever actuated 3-position Climb/Trail/Descend, 3-position Trail Adjust, air spring pressure, rebound, BOOSTVALVE™, angled air valve for easier access, lightweight chassis.
|
|
: Kashima coated air sleeve and body, remotely actuated 3-position Climb/Trail/Descend, improved remote mechanism, BOOSTVALVE™, air spring pressure, rebound, angled air valve for easier access, lightweight chassis.
|
|
: Kashima coated air sleeve and body, lever actuated 3-position Climb/Trail/Descend, air spring pressure, rebound, angled air valve for easier access, lightweight chassis.
|
|
: Kashima coated air sleeve and body, remotely actuated 3-position Climb/Trail/Descend, improved remote mechanism, air spring pressure, rebound, angled air valve for easier access, lightweight chassis.
|
|
|
spring
|
air
|
|
riding styles
|
XC, trail, AM
|
Installing Your Shock
If you are installing your shock on a bike for which the shock is not
original equipment:
- Install the shock.
- Remove the main air
chamber air cap and let all the air out of the main air chamber.
- Carefully cycle the
suspension through its entire travel.
- Check that all parts
of the shock are clear of the frame and swingarm as it cycles through
the travel.
- Pressurize your main
air chamber to a minimum of 50 psi and no more than 300 psi. You will
tune to a more specific air pressure in the Setting
Sag section below.
- Set
sag.
General Maintenance
There may be a small amount of air sleeve lubricant residue on the body.
This is normal. If this residual air sleeve lubricant is not present,
this is an indication that the air sleeve should be re-lubricated. Some
other things to consider for all shock models:
- If you ride in extreme
conditions, service your shock and air sleeve more frequently. Check
the maintenance schedule for your shock.
- Wash your shock with soap
and water only.
- Do not use a high pressure
washer to clean your shock.
- Internal service should
be performed by FOX Racing Shox or an Authorized
Service Center.
Before You Ride
- Clean the outside of your shock with only mild soap and water,
and wipe dry with a soft dry rag.
NOTE: Do not use any solvents or de-greasers, as these products can damage the shock's exterior finish or its anodized parts.
Do not spray water directly on the seal/shock body junction. Do not use a on your shock.
- Inspect the entire exterior of your shock. The
shock should not be used if any of the exterior parts appear to be damaged.
Contact your local dealer
or FOX Racing Shox for further
inspection or repair.
- Make sure that your quick-release levers (or thru-axle
pinch bolts) are properly adjusted and tightened.
- Check your headset adjustment. If loose, adjust it accordingly
to your bicycle manufacturer's recommendations.
- Check that all brake cables or hoses are properly
fastened.
- Test the proper operation of your front and rear brakes
on level ground.
Setting Sag
- Measure
and set sag, and compare your result to the sag setting shown in the Air Spring Setting Guidelines table
below.
Air Spring
Setting Guidelines |
Shock Travel
(in./mm) | 25 % Sag
(in./mm) |
1.00/25.4 | 0.25/6.4 |
1.25/31.7 | 0.31/7.9 |
1.50/38.1 | 0.38/9.5 |
1.75/44.4 | 0.44/11.1 |
2.00/50.8 | 0.50/12.7 |
2.25/57.1 | 0.56/14.2 |
2.50/63.5 | 0.63/15.9 |
- If your measured sag value doesn't match the table value, add or release air pressure in 5 PSI increments:
- if your measured sag value is less than the table sag value, screw on the pump fitting, note the current air pressure setting and depress the black bleed-valve to reduce the gauge pressure by 5 psi. If necessary, measure and set sag again and repeat this adjustment.
- if your measured sag value is greater than the table sag value, screw on the pump fitting, note the current air pressure setting and pump to increase the gauge pressure by 5 psi. If necessary, measure and set sag again and repeat this adjustment.
- Repeat until your target sag is achieved, then replace the air valve cap.
Climb. Trail. Descend.
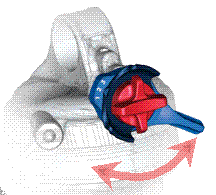
With an easy flip of the blue CTD lever, you will quickly achieve optimum rear suspension performance for all types of riding terrain.
- Climb mode: engages the firmest low-speed compression setting for maximum pedaling efficiency.
- Trail mode: a moderate low-speed compression setting for an optimal blend of pedaling efficiency and bike control, in undulating riding terrain.
- Descend mode: sets the low-speed compression setting to fully open, for plush absorbency and maximum bike control on steep, aggressive descents.
The blue CTD lever switches your riding platform modes. Rotating 120° between Descend mode position (shown below), change to Trail mode (when the CTD lever is positioned in line with the shock), and Climb mode (when the CTD lever is turned all the way clockwise, to the left).

The black Trail Adjust control on the CTD BV model allows you to fine-tune your riding platform to soft, medium, or firm within Trail mode only.
Adjusting Rebound
Rebound controls the rate at which your shock returns after it has been
compressed. The proper rebound setting is a personal preference, and changes
with rider weight, riding style and conditions. A rule of thumb is that
rebound should be as fast as possible, without so vigorously bouncing back and pushing you out of the saddle.
The rebound knob has 12-15 clicks of adjustment.
For slower
rebound, turn the red adjuster knob clockwise.
For faster
rebound, turn the red adjuster knob counter-clockwise.
Bushing
Technology & Inspection | Control
Direction | Oil Volumes | Structural
Inspection | Dropout Thickness Inspection | Torque Values | Unit
Conversion | Suspension Tuning Tips | Using
the Pump | Important Safety Information | Service Intervals | Contact FOX Service | Warranty Information | FOXHelp Service Web Site
Copyright © 2012
FOX Factory Inc.


