


|

|

|

|
Installing Your Fork | Before You Ride | Setting Sag | Adjusting Rebound | Climb. Trail. Descend. | Adjusting Trail Mode | About Terralogic® Brassmass™ | Adjusting Terralogic® Threshold | Service Intervals | Important Safety Information
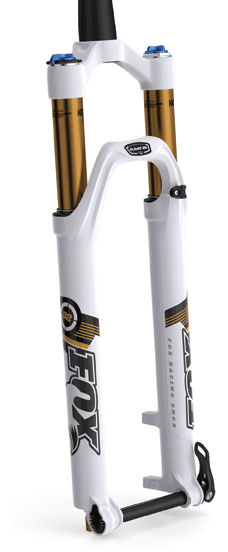
|
travels |
|
|||||
|
model features, adjustments |
|
||||||
| lower leg options |
|
||||||
|
spring |
air |
||||||
|
riding style |
trail, XC |
Be sure your fork is properly installed before proceeding. If your fork came pre-installed on your bicycle, continue to the next section.
NOTE: Do not use any solvents or de-greasers, as these products can cause serious damage to paint and anodized parts (upper tubes, knobs, steerers).
Do not spray water directly on the seal/upper tube junction. Do not use a high pressure washer on your fork.
To get the best performance from your fork, it is necessary to set the proper air spring pressure by adjusting sag. Generally, sag should be set to 15-25% of total fork travel.
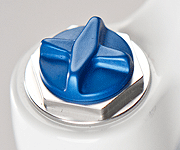
TIP: Use your air spring PSI value in "32 FLOAT 29" only as a starting point. Discovering your best sag value is a process that takes some time to fully discover, given your riding style, bike geometry, total weight, and suspension feel preferences.
NOTE: Be sure to return the blue Terralogic® threshold adjust knob setting to fully clockwise in after achieving proper sag.
Rider | Suggested Air Spring Pressure Settings PSI | |||
80 mm | 100 mm | 120 mm | 130 mm | |
≤125 | 60 | 55 | 50 | 45 |
125 - 135 | 60 | 55 | 50 | 45 |
135 - 145 | 65 | 60 | 55 | 50 |
145 - 155 | 75 | 70 | 65 | 60 |
155 - 170 | 85 | 80 | 75 | 70 |
170 - 185 | 90 | 85 | 80 | 75 |
185 - 200 | 95 | 90 | 85 | 80 |
200 - 215 | 100 | 95 | 95 | 95 |
215 - 230 | 110 | 100 | 100 | 100 |
230 - ≥250 | 120 | 110 | 110 | 110 |
Travel | XC/Race FIRM | All-Mountain PLUSH |
80 mm (3.50") | 12 mm (0.50") | 20 mm (0.75") |
100 mm (3.90") | 15 mm (0.62") | 25 mm (0.98") |
120 mm (4.70") | 18 mm (0.69") | 30 mm (1.19") |
| 130 mm (5.12") | 19.5 mm (0.77") | 32.5 mm (1.28") |
Symptom | Remedy |
Too much sag | (+) air pressure in 5 psi increments |
Too little sag | (-) air pressure in 5 psi increments |
Excessive bottoming | (+) air pressure in 5 psi increments |
Harsh ride; full travel not utilized | (-) air pressure in 5 psi increments |
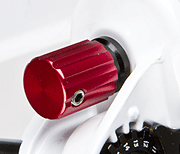
The rebound adjuster knob is located at the bottom of the right fork leg.
Rebound controls the rate of speed at which the fork extends after compressing. Turning the knob clockwise slows down rebound; turning the knob counter-clockwise speeds up rebound. As a starting point, turn the rebound adjuster knob all the way clockwise (full in) until it stops, then turn counter-clockwise (out) 12 clicks.
|
Knob Setting |
Setting Description |
Tuning Tips |
Setup Tips |
|
|
Slow Rebound |
Too slow and your fork will pack down and ride harsh. |
If you increase your spring rate or air pressure, you will need to slow down your rebound |
|
12 (Factory setting) |
Average Rebound |
|
|
|
|
Fast Rebound |
Too fast and you will experience poor traction and wheel hop. |
If you decrease your spring rate or air pressure, you will need to speed up your rebound setting. |
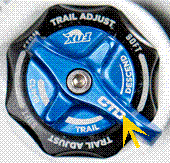
The blue CTD lever lets you to switch between the Climb, Trail, and Descend ride modes. Each mode is most suitable for each specific type of terrain, providing best performance and riding enjoyment with your fork. With some experience, you can experiment with using Trail mode when descending, or Descend mode for flat or undulating trails.
NOTE: With full CTD suspension, front to rear suspension balance is best achieved by running the fork in the same ride mode as the rear shock (Climb with Climb, Trail with Trail, Descend with Descend).
Rotate the CTD lever fully clockwise to set the fork in Climb mode, which is most useful for climbing and sprinting. In Climb mode, the fork will "blow off" in the event that a big hit is encountered. This setting was formerly known as “lockout.”
There are two pre-set Climb Tune mode settings offered for Factory and Performance model forks: medium and firm.
Refer to the Climb Tune decal located on the crown next to the CTD lever, to determine which factory pre-set climb tune your fork has:

|
Medium factory settings will be found on longer travel forks (130 mm travel and above for 26" forks, and 120 mm travel and above, for 29" forks) |

|
Firm factory settings will be found on shorter travel XC-type forks |
Climb Tune factory settings can only be altered through complete disassembly and re-bleeding of the CTD damper system. Contact your local dealer or FOX at 1-800-FOX-SHOX for more information. Additional service information can be viewed at http://service.ridefox.com.
NOTE: The fork may cycle a couple of times after you engage Climb mode. Once complete Climb mode is achieved, the fork may continue to move 3 - 5 mm. This is normal, and does not negatively affect performance.
Rotate the lever to the middle setting of the blue CTD lever to engage Trail mode. Trail mode offers significantly less compression damping than climb mode, which is good for a light pedaling platform when pumping undulating terrain, and for preventing excessive travel in technical riding situations (such as low-speed drops).
Rotate the lever fully counter-clockwise to set the fork in Descend mode, which is similar to Trail mode but with significantly less low-speed compression damping, for the softest ride when descending.
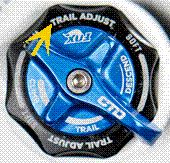
Factory FIT CTD Trail Adjust model forks feature a three-position Trail Adjust control that regulates low-speed compression damping only while you are in Trail mode.
NOTE: While it is possible to readjust FIT CTD Trail Adjust when you are in either Climb or Descend mode, Trail Adjust changes will only be felt in Trail mode.
For a firmer low-speed compression setting in Trail mode, turn the black Trail Adjust dial clockwise. For a lighter setting, turn the Trail Adjust dial counter-clockwise.
TIP: This setting is designed to work in conjunction with the rear shock, keeping in mind that front to rear suspension balance works best when the fork is in the same ride mode as the rear shock.
|
Knob Setting |
Setting Description |
Tuning Tips |
Setup Tips |
|
|
Firm Compression |
Too firm and you will experience poor traction and wheel hop. |
Resists brake dive and keeps the fork up in the travel. Too firm and you may have poor traction in loose conditions. |
|
3 |
|
|
|
|
|
Soft Compression |
Too soft and your fork will pack down and ride harsh. |
Maximum wheel traction and bump compliance. Too soft and you may have excessive brake dive and a wallowy feel. |
The Terralogic® damper contains a weighted brass inertia valve called Brassmass™, which freely slides on a shaft to open and close compression flow ports in the damper.
The Brassmass™ assembly automatically responds to the impact of bumps or potholes in the trail, opening the compression flow ports and allowing the flow of damping oil. The Brassmass™ assembly does not respond to rider input (pedaling, sprinting, G-outs), keeping the compression flow ports closed and maintaining the pedaling platform or the feeling of fork lockout. With the patented timer circuit constantly in control as you ride, the transition between maximum pedaling efficiency and low speed damping control is nearly instantaneous.
The 15-position blue Terralogic® threshold adjust knob located on the bottom of the right fork leg allows you to fine-tune your pedaling platform balance anywhere between lockout-firm to fully open plush damping (or zero pedaling platform).
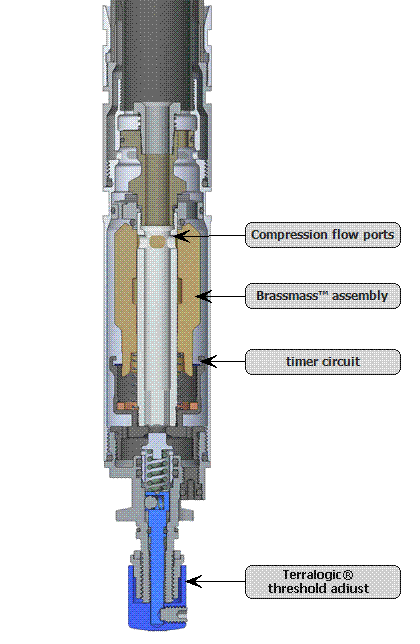
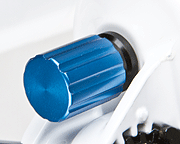
Terralogic® threshold is an adjustable compression blow-off valve that bypasses the Brassmass™ assembly, adjusted with the blue knob located on the bottom of the right fork leg. This knob enables you to regulate compression platform when the Brassmass™ assembly is closed.
NOTE: If you have just set your rebound, return the blue Terralogic® threshold adjust knob to fully clockwise in, before making your Terralogic® threshold adjustment.
To make pushing through the fork travel harder and increase the pedaling platform, turn the threshold adjust knob clockwise. Turning the adjust knob completely clockwise makes the fork feel locked out—until the Brassmass™ activates from the force of impacting a bump in the trail terrain.
To make pushing through the fork travel easier and decrease the pedaling platform, turn the threshold adjust knob counter-clockwise. Turning the knob fully counter-clockwise bypasses the effect of the Brassmass™ assembly entirely. The threshold adjust knob has fifteen (15) clicks of adjustment.
|
Knob Setting |
Setting Description |
Suggested Application |
Setting Characteristics |
|
0-4 |
Very firm pedaling platform |
XC racing and trail riding |
Offers the greatest pedaling efficiency, while sacrificing some low-speed traction. |
|
4-7 |
Moderately firm pedaling platform |
XC racing and trail riding; all-mountain |
Offers less pedaling efficiency while increasing low-speed traction. |
|
6-12 |
Light pedaling platform | Trail riding, all-mountain | Further increasing of low-speed traction, while still providing a light pedaling platform. |
|
15
|
No pedaling platform |
Downhill shuttle runs |
Offers maximum low-speed traction, without any pedaling platform. |
In the table below, FOX offers a suggested range of Terralogic® threshold adjustment settings per fork travel, as a starting point for your experimentation. As no two riders are the same (weight, strength, riding style, terrain choices, or simply that personal preference with riding "feel"), FOX encourages you to spend some time exploring the possibilities with Terralogic® threshold adjustment, to discover that "sweet spot" when it just feels right to you.
|
Fork Travel |
Suggested Terralogic® Threshold Settings |
| 3.15–3.94/80–100 | 0-4 |
| 4.72–5.12/120–130 | 4-8 |
| 5.51–5.90/140–150 | 8-12 |
|
|

|
Bushing Technology & Inspection | Control Direction | Oil Volumes | Structural Inspection | Dropout Thickness Inspection | Torque Values | Unit Conversion | Suspension Tuning Tips | Using the Pump | Important Safety Information | Service Intervals | Contact FOX Service | Warranty Information | FOXHelp Service Web Site
Copyright © 2012
FOX Factory Inc.