Air Sleeve Maintenance BUY
ITEMS
WARNING: FOX air shocks contain high air pressures. Improper handling may cause SERIOUS INJURY or DEATH. Before servicing
a FOX air shock, certain precautions must be taken. Follow these steps to prevent serious injury, and always wear
eye protection. If you do not feel confident about performing the following procedure,
contact FOX Racing Shox or an Authorized Service Center to schedule a service repair.
CAUTION: When working on an air shock, always assume that it is stuck down before starting service.
- Before beginning service,
you need to make sure that the air shock you are servicing is not "stuck-down".
A “stuck down” shock is one that is stuck at the bottom of its travel,
and will not return. This is due to a failure of the dynamic air seal located between the positive and negative air chambers within the shock air sleeve; the negative chamber retains a higher air pressure than the positive chamber.
- The first step in troubleshooting
a stuck-down shock is to pump up the main air chamber to 250 psi using
a FOX High Pressure Pump.
- The shock may extend
slightly. However, the shock can still be “stuck down.” Continue on to
the next step with caution.
- Release all air pressure
from the air sleeve air valve.
- Cycle the shock a few
times, then release air pressure from the air sleeve air valve again.
- Remove the mounting
hardware and remove the shock from the bicycle. In most cases, a hex wrench
is all that is necessary to remove the mounting hardware. Hex wrench size
will vary depending on manufacturer.
- Remove
reducers from the body end of the shock using a 1/4” bolt extractor.
- Place the shock in
a soft-jawed vice being careful not to crush any shock parts. Place the
breaker bar through the body eyelet and attempt to pull out the body shaft.
If you cannot pull it out, this confirms that the shock is “stuck down.”
Proceed with caution.
- Put on your gloves
and place a shop towel through the body eyelet to prevent the air sleeve
from coming off. Use a strap wrench to turn the air sleeve counter-clockwise.
YOU MAY HEAR A VERY LOUD POP WHEN REMOVING THE AIR SLEEVE! This is normal
for a “stuck down” shock.
- Finish unscrewing the
air sleeve by hand and pull it back from the shaft.
- Remove the shop towel
from the body eyelet then fully remove the air sleeve.
- Clean the inside of
the air sleeve with isopropyl alcohol or parts cleaner.
CAUTION: Although a full set of replacement seals has been provided,
it is not necessary to replace all of them on a brand-new unused shock.
The body seal (quad ring) still needs to be replaced however, as described
in steps 17-18.
- Clean the internal
parts with isopropyl alcohol or parts cleaner.
- If necessary replace
seals and backup rings with new seals and backup rings from the Air Sleeve
Rebuild Kit, FOX P/N 803-00-142, as described in the following steps.
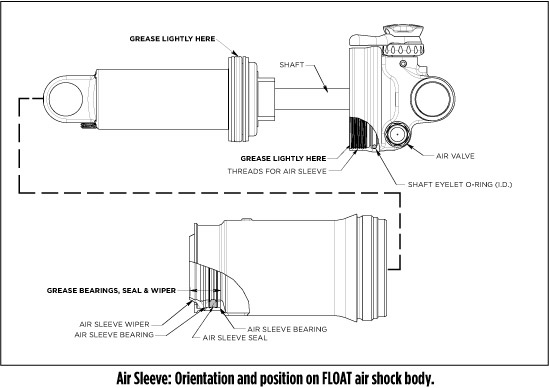
-
When replacing the
air sleeve wiper, seal and backup rings, ensure that they are properly
oriented. Lightly lubricate all seals and rings before installing them.
Use no more than half of the FLOAT Fluid pillow pack for this entire procedure.
-
Two shaft eyelet o-rings
are supplied with the Air Sleeve Rebuild Kit; a 2000-04 FLOAT rear shock
uses the thicker o-ring, the 2005 and newer uses the thinner o-ring.
- Remove the body seal
(quad ring) and two backup rings, being careful not to scratch the inside
of the seal gland.
- Lightly lubricate the
seals and rings before replacing them. Make sure that you use the backup
rings with slits. In this order, install a: 1) backup ring, 2) body seal
(quad ring), 3) the other backup ring onto the seal gland.
- If necessary, replace
the shaft eyelet o-ring. Carefully remove the old o-ring using a dental
pick. Lightly lubricate the new o-ring before installing it.
- If necessary, remove
the air sleeve dust wiper, seal and backup rings. Carefully remove these
parts using a dental pick. If you are not removing these parts, skip to
step 22.
- Replace the backup
ring, seal, backup ring, and dust wiper into the air sleeve seal glands.
Note: Squeeze the backup ring "like a potato chip” to facilitate
installation.
- Slide the air sleeve
onto the body. Do not screw the air sleeve on at this time.
- Place 2 cc of FLOAT
Fluid into the air sleeve. Do not screw the air sleeve on at this time.
- Install the travel
indicator o-ring onto the body. Place the reducers (or requisite mounting
hardware) back onto the body eyelets.
- Mount the shock back
onto the bicycle using the appropriate mounting hardware. Torque the bolts
to the bicycle manufacturer’s specifications. Due to frame design, you
may have to tighten the air sleeve before re-installing the shock.
- Press down on the bicycle
seat to compress the rear suspension. This will make it easier to screw
on the air sleeve. Thread the air sleeve by hand until it is tight. DO
NOT overtighten with a strap wrench or other tool.
- Inflate your shock
according to the shock owner’s manual.
- Go ride.
Bushing
Technology & Inspection | Seals & Foam
Rings | Control
Direction | Oil Volumes | Structural
Inspection | Dropout Thickness Inspection | Torque Values | Unit
Conversion | Suspension Tuning Tips | Using
the Pump | Important Safety Information | Service Intervals | Contact FOX Service | Warranty Information | FOXHelp Service Web Site
Copyright © 2011
FOX Factory Inc.


